1.1.10

Cheesecake Cream Cheese Brownies


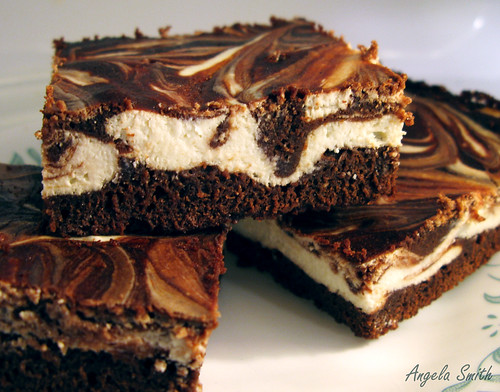
These cheesecake swirled brownies barely lasted 5 min after they were cooled -- everyone enjoyed them thoroughly.

Here is the recipe:

Ingredients
Cheesecake batter:
* 1 (8-ounce) block fat cream cheese
* 1/3 cup granulated sugar
* 1/4 teaspoon peppermint extract (* i nearly tripled this, so it would be a stronger/better taste*)
* 1 large egg
* 1 large egg white
* 1 tablespoon all-purpose flour

Brownie batter:
* 4.5 ounces all-purpose flour (about 1 cup)
* 1/2 cup unsweetened cocoa
* 1/2 teaspoon salt
* 1 1/2 cups packed brown sugar
* 1/4 cup canola oil
* 1/4 cup buttermilk (Or milk)
* 2 teaspoons vanilla extract
* 2 large egg whites
* 1 large egg

Preparation
1. Preheat oven to 350°.
2. To prepare cheesecake batter, place cheese in a medium bowl; beat with a mixer at medium speed until smooth. Add granulated sugar and peppermint extract; beat well. Add 1 egg and 1 egg white; beat well. Add 1 tablespoon flour; beat mixture just until blended.
3. To prepare brownie batter, weigh or lightly spoon 4.5 ounces (about 1 cup) flour into a dry measuring cup; level with a knife. Combine 4.5 ounces flour, cocoa, and salt in a medium bowl, stirring with a whisk. Combine brown sugar, oil, buttermilk, vanilla, 2 egg whites, and 1 egg in a large bowl; beat with a mixer at medium-high speed until well blended. Add flour mixture to brown sugar mixture; beat at low speed just until blended.
4. Reserve 1/2 cup of brownie batter. Pour remaining batter into a 9-inch square baking pan coated with cooking spray. Carefully pour cheesecake batter over top; spread evenly to edges. Dot cheesecake batter with reserved brownie batter. Swirl top two layers of batters together using the tip of a knife. Bake at 350° for 26 minutes or until top is set. Cool completely in pan on a wire rack.


Photographs are © Copyright to me (or others when indicated) and are not in the public domain and may not be used on blogs, websites, or in other media without advance written permission from me.

Disney Cars Racetrack Cake


Disney Cars Racetrack Beach Cake


This cake was sure fun to make!  I got to combine a beach scene with Disney’s Cars racing on a dirt racetrack.  The client was a little boy who loved the ocean and the new Cars movie.

In order to make this cake work I decided to add a bunker and line of continual sand dunes across the beach front which separates the racetrack from the actual beach.  There are three different types of sandy beach course sugar mixtures that make up the beach and dirt.  The racetrack is made with raw brown sugar, graham cracker crumbs, and crushed chocolate Oreo cookies.  The next lightest sand area is raw sugar with a brown food coloring and graham crackers.  The lightest sandy are is made with a mixture of course raw sugar and white sugar.
 
I used butter-cream frosting that I separated into three bowls and made green, white, and blue.  The green I used for the grass, and the blue and white for the sea waves.  Candied chocolate rocks litter the beach and racetrack to add even more detail.  The two cars are toys.

Photographs are © Copyright to me (or others when indicated) and are not in the public domain and may not be used on blogs, websites, or in other media without advance written permission from me.

Neapolitan Ice Cream Cupcakes


These mini Neapolitan ice cream cupcakes are colored and flavored to taste just like the Neapolitan ice cream.  The bottom layer is chocolate, followed by vanilla, and last is strawberry (which is also pink colored).  Each cupcake is then topped with a vanilla butter-cream scoop of ‘ice cream’ which is topped with homemade fudge chocolate sauce and sprinkles.
The little cherries are hand made from two colors of fondant.  The entire cupcake is edible ice-cream flavored fun.

Photographs are © Copyright to me (or others when indicated) and are not in the public domain and may not be used on blogs, websites, or in other media without advance written permission from me.

Triple Chocolate Chip Cookies

I recently made these cookies. They are very delicious! They are partly my own creation -- partly not. It is known that cookie recipes are not a secret, it is what sweets you add in them that make them special! (Some say it is also the love that goes into them that counts too, and I add that in large proportions in all my sweets!)

Here is the recipe:

Triple Sweet Chip Cookies

Ingredients:
1 c. butter
3/4 c. brown sugar
3/4 c. granulated sugar
2 eggs
1 tsp. Vanilla extract
2 1/4 c. flour (may take up to a 1/4 c. more flour, depending on how you measure everything out)
1 tsp baking powder
1 tsp salt

1+ c. Chocolate chips
1+ c. White chocolate (vanilla) chips
1+ c. Peanut butter Chips
(the proportions of chips will vary depending on how many chips you want in your cookies)

Directions:
1. Beat the butter, and sugar together. Add vanilla and eggs, beat well.
2. Add the dry ingredients and mix well.
3. Add desired portions of the three yummy chips.
4. I took the dough and made it into small rounds, about the size of a small doughnut hole, or a US quarter.
Bake at 350 degrees, for 11 min (if you make larger cookies then you'll need a longer cook time).


Photographs are © Copyright to me (or others when indicated) and are not in the public domain and may not be used on blogs, websites, or in other media without advance written permission from me.

California Beach Cake

I made this cake for a scouting event, it was auctioned off and the donations were given to the scouts to further their 'education' at scout camp.
It was fun to make this cake, because I got to choose the materials and design.
I made the shells out of fondant (hand sculpted), everything is edible. The rocks were made from chocolate and coated with a candy coating (they are not handmade). I also painted a bit of coloring on the fondant shells.
The layers on the inside cake go as follows; Bottom: sandy brown. Middle layer: white. Top layer: sky blue.
The frosting was made from a simple butter-cream frosting recipe. I used paste-based food coloring to color the frosting. The sand of the cake is made from a mixture of raw cane sugar, and turbinado sugar (natural/unrefined brown sugar). To make the darker "wet" part of the sand I added a bit of brown food dye to the sugar.
I wanted the cake to have an artistic quality to it, cartoon-ish, some would say, thus I purposefully made the water blue, without any whitecaps. I thought it looked more artistic/less real that way.


Photographs are © Copyright to me (or others when indicated) and are not in the public domain and may not be used on blogs, websites, or in other media without advance written permission from me.

Nascar Race Car Cake

I was pretty sick when I was told that I needed to make a cake with less than a days notice, for a surprise birthday party. I was ecstatic about the theme of the cake. I have been wanting to make a race car-type cake for quite some time, but never had a reason to; until now.

I set up the fondant and quickly sketched out what I wanted the cake to look like. I was too limited on time to create what I really wanted to, so I had to stick with a traditional-style cake. The flavor of the cake was carrot cake, with butter-cream frosting. I used fondant to make the car and the blacktop.

I made the little Nascar race car out of green fondant, and let it set for a bit before applying the details. I rolled out each 'decal' and cut them with a knife. I also cut out the number 18, with a knife and placed them all on the car. After they had time to set I used a little bit of food coloring to write on the decals and make them look more like adds. I employed my little sister to help me do the base layer of white frosting to the cake. I rolled out some black fondant and cut it to the approximate shape that I desired. After laying the blacktop down on the cake, I mixed the green into the butter-cream frosting and pipped the grass onto the cake. Shortly after that the cake was finished and heading off to surprise an 18 year old female-Nascar fanatic!


Photographs are © Copyright to me (or others when indicated) and are not in the public domain and may not be used on blogs, websites, or in other media without advance written permission from me.

Halloween Chocolate Truffle Candies


Homemade Chocolate Truffle Candies

Ingredients
     Candy shell:
1-2 c white chocolate
Paste based food coloring
     Truffle filling:
3 c dark or milk chocolate
1 14 oz can of sweet and condensed milk
*Optional for the fall season: 2 tsp of pumpkin pie spice + 2 tsp of cinnamon

Directions
1. Melt the white chocolate in the microwave and add orange food coloring (if you so desire) to create a pumpkin-orange chocolate color.  I have a pumpkin shaped mini cupcake silicone mold that I use for my pumpkin candies but any shape can be used. 
2.  Coat the inside of the candy shell molds with the colored white chocolate and place in the freezer to set.
3.  While candies are in the freezer mix together 3 cups of dark chocolate with the can of sweet and condensed milk.  Heat the mixture in the microwave until the chocolate is completely melted.
4. Allow the dark chocolate truffle mixture to cool to a temperature that is easily handled and then remove the chocolate candy mold from the freezer.
5.  Spoon the dark chocolate truffle mixture into each candy mold, filling until almost completely full.
6. Take the remaining while chocolate and spread evenly over the top of the truffle layer until the mold is completely full.
7.  Place the candies into the freezer and freeze until completely set (or hard).
8.  Remove candies from the freezer and carefully remove them from their molds, allow candies to thaw to room temperature before consuming.